Sunday, November 30, 2008

Fiber-cement panel mock up

Our sub-contractor (Danny from Longboard Contracting) will begin installing the fiber-cement panels on Monday. I don't know if I mentioned this in an earlier post, but we decided to go with panels by Certainteed. Most fiber-cement products on the market are by James Hardie (as in "Hardiplank") which is a great product. Both Hardi and Certainteed products contain recycled content, are manufactured locally, and are extremely durable. The main reason we decided to go with Certainteed was the fact that, in addition to the recycled content, they guarantee a minimum of 30% recycled fly ash in their mix. Another reason was the better color selection as well as their finish. All pre-finished Hardipanels have a slight sheen that we weren't crazy about.

The irony, of course, is that we eventually chose the unfinished (just primed) panel from Certainteed because the primed finish closely resembled a concrete color had a great subtle texture to it. The image to the left shows the mock-up of the F-C panels and the window trim detail on the rear facade of the house.

Now you do have to eventually finish the panel (either paint or seal) in order to retain the 50 year warranty, but Certainteed gives you a two year window to do this before they'll void their warranty. Hardipanel is also available in a primed finish, but they only give you a 3 month window before you have to finish it. To me, this says something about the manufacturer's confidence in the durability of the raw material, although I am sure that Hardi's product would hold up just fine. Eventually the owner of the house will have to make a decision on whether to paint the panels or simply seal them, if they want to keep the warranty. The beauty of the primed panels is that they could also be painted subtly different colors to form kind of a patchwork pattern, if desired.

Either way, we are excited to see the panels go up as this is the final stage of the exterior cladding. Danny has been great to work with so far and has helped us find the best way to achieve the look we want. He's not the 'cheapest' installer out there, but he has a great reputation and it is very important that this part of the project be done well...so it's worth it.

Friday, November 28, 2008

Opening up the west wall

Well, I don't know why it took so long but we finally were able to cut the openings in the west wall (the existing brick masonry wall) that will house the new windows in the Dining Room & Living Room on the first floor and the bathroom on the second floor. Maybe the GC was waiting till the end so he could make a quick getaway when the whole house came crashing down. Ha, ha. But seriously, the whole process went fairly smooth and was fascinating to watch. The old wall held up nicely while they installed the concrete lintels. We tried to save most of the bricks but many of them broke during removal. The remnants will make their way to CWM's yard for crushing.


We have two big windows (side by side w/ a column in between that you can see in the upper right image) that will be going in the dining room wall and a long double awning that will be going high on the living room wall (this is the opening the guys are placing the lintel in and you can see it in the upper left image). The bottom left image shows the full opening for the windows in the bathroom at the second floor. These will actually be two casement side by side with a column in between (aligned with the windows above and below) but the column is not built yet.

The remaining windows will be installed on Saturday. We are so lucky to be able to have windows on the side of the house. I was amazed to see how much light the openings let into the first floor space. And although these windows are on the west wall and could get a lot of harsh western sun, we are benefiting greatly from the large shade tree next door as well as the neighboring houses that are tall enough (3-stories) to block much of the direct sun in the late afternoon but far enough away (roughly 20' due to the alley and their yards) to still allow plenty of light in.

Wednesday, November 26, 2008

The metal roof panels are in

The sheet metal fabricator/installer (Jason Pacetti) finished installing the Zalmag metal roof panels on the mansard today. We purchased the metal in coil stock (3 tightly wound rolls - 20"wide x 150' long) and then had the flat seam folded panels fabricated here in Philly. Every chance we get we try to have the raw materials shipped and then have a local fabricator make the product. There is still an embodied energy involved but this way we are injecting money into the local Philadelphia economy instead of having the products made somewhere else. Additionally, we form a relationship with local tradesmen.


We are very happy with the roof and Jason did a great job on the panels. One lesson we learned here was that the next time we decide to use metal roof panels we will get the material in sheets (4'x8', for example) instead of coil. The reason we got the 20" wide coil was to maximize the material, eliminate waste, and it was a bit cheaper. Because we would not have to rip it (lengthwise) but simply cut the length of the panel we wanted (crosswise) as it was unrolled, there would be no waste. We ultimately wanted an 18"x36" panel. A 20"W piece of metal actually yields an 18"W panel after the two long edges are folded. So by cutting the roll into 38" pieces we would have our ideal size panel. Sounds easy enough, huh?

Not so much in the end. You see the material came wound so tightly that the fabricator had a really hard time straightening in out. He had some concern with "oil canning" (warping you sometimes see on metal roofs) since the panels were a fairly large size. He was going to try to "reverse roll it" but he felt it might get scratched. In the end, he had to work the metal a great deal to make the panels look good (and he did a great job and never raised his price). Also, when dealing with a coil you run the risk of any small dent or ding on the end of the coil repeating itself over and over as you unroll it.

Lastly, we are very pleased with the connection details (folded seams, turning of corners, meeting the windows, etc) that Jason came up with. He took the time to do it right. It is refreshing to work with someone who really cares about quality and gets excited about working on a project where the client cares as well.

We love the metal but would never get it in coil stock again if we planned on making flat panels. Next time, we figure if we can live with a 14"x30" panel we could divide up a 4'x8' sheet and have virtually no waste.

Here's a link to the metal (Zalmag) manufacturer: http://www.millenniumtiles.com/

Monday, November 24, 2008

Update on the roof hatch

Well, last week we finally said goodbye to our old plywood roof hatch. Our beautiful new hatch arrived last Monday and it took a total of about 20 minutes to install with some weatherstripping, silicone, and a few screws. The fit was perfect. It lets a ton of light into the space (not that it really needed it) and with the hydraulic arms, it opens very smoothly. I feel pretty confident about the insulation value due to the overlapped connection and the double insulated dome. I like the fact that it's not frosted, so on clear days and nights you can look up and see the sky. See previous post for full description of the hatch.


Sunday, November 23, 2008

All inspections passed

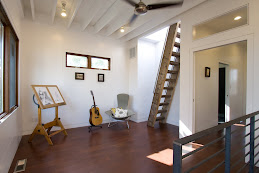
We have successfully passed all of our construction inspections. We are now ready for spray foam insulation (which will begin next week) and then drywall shortly after. There has been a lot of progress over the last week on other fronts too (stairs, the metal mansard, fiber-cement paneling, etc) which I will go over in the next few posts and try to get everyone up to speed.

Plumbing: Over the past two weeks we wrapped up all the piping and rough-ins and subsequently passed inspection (and we now have water). The whole process was a bit tricky due to the fact that we had the water shut off over a year ago because we knew weren't getting started for a while and didn't want to keep paying a bill. This meant the water department came and actually removed the meter from the house. Well, when our plumber gave us the original cost estimate he mentioned to us that he does not know the state of the pipe coming in from the street due to the fact that there is no meter and the water had been off for a while. This meant that he might have to tear up the sidewalk to make a new connection from the curb to the house and possibly from the curb to water main (under the street), if a lead pipe was still there. The cost incurred for all this work would be over $10K and has been hanging over us ever since receiving the estimate. We would not know what we had to do till the water department came out.

I remember the City tearing up the whole street a couple of years ago and replacing some lines but I never found out what exactly they replaced. The plumber's "worst case scenario" was that they replaced the water main and, since the house was abandoned at the time, they just cut off the connection which would then have to be replaced. Fortunately, we found that when PWD came last week to install a new meter, the pipes under the sidewalk appear to be in good shape (and still connected) and the pressure is good and steady...thus requiring no outside work. Whew! So the plumber came back and hooked up his main supply line to the meter and we are now in business. But the mystery street work remained.

Electrical: We passed our electrical inspection shortly after plumbing. This process involves a bit of orchestration too as, unlike the other trades, PECO doesn't actually do the electrical inspection. What they require is that an "independent underwriter" actually perform the inspection and then report to PECO when they are finished. PECO then comes out, checks to see verification from the underwriter, then (in our case) strings the line from the main power line running along the street to the front of the house. It is then our electrician's job to actually connect the wires from the street to the wires running up a conduit on the side of our house. Usually these are located on the front face of row houses, but we got lucky and were able to keep the conduit on the side since we're an end unit. And by the way, the owner can contact the underwriter directly. PECO has a short list of recommended ones, but our electrician has someone that he always works with and was able to come out on short notice. I recommend going this route, if possible, as you never know how long an underwriter will take if you are cold calling them.

At this point, we are still waiting for PECO to show up to run the wires. We were told this would be last Mon or Tues. but so far they haven't made an appearance. After PECO finishes their work and our electrician connects the two lines, we'll have power.

HVAC: There doesn't appear to be an official mechanical inspection, although we did find out that the City is now requiring everyone to get an HVAC "permit" (which they never did before). It costs about $500. We got our permit last Friday so we're good to go.

The mechanical contractor finished installing the furnace in the basement, which barely fit since we bumped up to a 14 SEER unit. I believe the units get bigger as you increase the SEER, so always keep that in mind when considering an upgrade. He also finished running the main return ducts and the supply ducts for the first floor...all running along the basement ceiling. He might have to come back later to tighten up a few things (tape joints, etc) but basically, he's done. I scheduled the gas company to come out tomorrow afternoon to install a new meter and turn the gas on. This is where the mystery street work was uncovered. It was the gas main that they replaced a couple of years ago and they did cut and cap the gas line to the house at the curb. So they have tear the sidewalk up in order to put a coupling on and reconnect our line to the street. Thankfully for us, PGW does this for free (unlike what the plumber was going to have to do).

The only snag in this process is that in order for the gas company to turn your gas on, they require at least one gas powered fixture in the house to be hooked up. Well, that's not a problem since the furnace is installed and ready to go. BUT, the furnace needs electricity to function and if the PWD gets there before PECO, well, then I guess we'll have to rig the furnace up to the generator (which I'm not even sure if this is possible). If not, then they will hook up the new meter and I will have to reschedule them to come back when we have power. ugh.

Also, regarding the ongoing battle about the city "requiring" everyone to put the gas meter on the front of the house (a total eye sore in addition to the fact that you then have to either protect it with bollards or box it in) there is at least one way to get around this. When doing a renovation project, the gas main is likely to be coming into the basement and that's where the old meter typically was. As much as possible, try not disturb this situation. They most likely will install the new meter where old one was because that's where the pipe is, thus solving the dilemma and getting your new meter in the basement.

Final Framing: This was the last official inspection (although the inspector still has to come back and check things out after insulation goes in.) We were asked to add some additional strapping to the roof rafters but that was about it. The inspector was very pleased with the solid construction and we in turn are very pleased to be done with ALL the inspections!

Wednesday, November 19, 2008

Open House scheduled

We decided the beginning of December will be a good time to have a "construction progress" OPEN HOUSE so folks can can come by and see first hand what we've been up to lately. The project will be at a point where all the systems are in and some of the drywall is up, but most importantly...we'll have heat and a working bathroom!

We still have a couple of months worth of work to do (install kitchen, flooring, trim work, fixtures, etc.) so we'll plan another open house to celebrate the final completion in the spring. In the interim, we thought it might be interesting to show the work-in-progress. We are going to try to make the event as educational as possible and, of course, we'll be on hand to give tours and answer any questions. All are welcome and bring your friends.

We'll be providing some refreshments (local cider, etc). See flier below for details. Everyone is welcome-spread the word!


Monday, November 3, 2008

Fabricator selected for steel stair

We have finally selected a fabricator for the steel stair that runs from the first to the second floor as well as all the related steel railings in the house. The work is now underway. This has been a long process which involved several quality bidders and a wide range of proposed bids.

Bill Curran (http://www.billcurrandesign.com/index.html) will be building and installing our stairs for us. Not only does Bill do beautiful work at a competitive price but he is also very accommodating and an extremely nice guy. He was also excited to be a part of our project and strongly supports what we're doing. We were immediately drawn to the clean, modern design sensibility of his work. Check out his site and make sure you scroll through all the images. His shop is in Philly just north of Chinatown, which he invited us to for our first design meeting. He lives above the shop in an amazing renovated industrial loft that basically acts as his showroom as he designed and fabricated almost all the furnishings (stairs, furniture, kitchen, etc). It was very impressive and very reassuring.

We have always had a pretty clear idea of what we wanted our stair to look like (and provided those details in the original set of drawings) and it was nice to find a high quality fabricator that was willing to build what we designed but was also able to help us refine the design and make it even better...and all within our budget. The basic design is fairly simple: an open riser stair with steel stringers, steel rod "ship-ladder" style railings, and wood treads. Very similar to the image below (which is from Bill's website.) The main difference is that we will have two stringers (opposed to the single, center stringer you see in the photo) and our railing posts are perpendicular to the top handrail, and the angle of the stair (opposed to perpendicular to the ground, as in the photo).


One important detail that we were always struggling with was the thickness of the wood tread. You see, when you have an open-riser stair, according to the residential building code, the open space between the top of one tread and the bottom of the next (essentially, part of the riser) cannot exceed 4" high (or as the code states: "must reject a 4" sphere"). Why a 4" sphere? Well, that's basically the size of a baby's head. This max. dimension was determined so that no one climbing the stairs could ever fall through the riser space. Makes sense. BUT, when your overall riser height is 7-3/4", the tread thickness (or the solid portion of the riser) needs to be a min. 3-3/4". Good luck finding wood that thick that is first, reasonably priced, and second, reclaimed timber. Basically, we needed a 4" x 10" (actual, not nominal) piece of wood. Over the past couple of months, this was proving to be a difficult find. Oh, and just so there's no confusion, the stair in the photo does not actually meet code and most likely received some sort of variance...which is totally feasible but we were trying to avoid any variances.

Also, the other drawback to this design was the tread was pretty bulky. So when we were going over all this with Bill, he presented a few possible alternatives. One of them involved adding a piece of steel that would connect the two steel angle supports (welded to the stringers that reach out to support the treads). This piece of steel would essentially run parallel with the tread nosing and set back about an inch. This allowed us to go back to a 2" thick wood tread and still meet code. The sketch below illustrates what I am talking about. The new steel piece is indicated in red.

One last detail that we went back and forth on was whether to go with 1/2" round rods or 1/2" square tubes for the balustrade. In the end, we decided on square as we thought it looked cleaner and aligned more with the overall design.

So how does sustainability factor into this feature? Well, there are a couple of different ways to approach a steel fabricated item such as a stair. One is to request that the item is made with salvaged steel. When doing something as precise and detailed as a stair, this can prove to be difficult because it will be hard to find the exact size and quantity of the pieces you need...never mind the condition the steel might be in if you plan on having them exposed. The other is to simply recognize that all steel that comes from a mill these days already has a high recycled content, sometimes up to 95%. And, of course, it's 100% recyclable. Therefore, simply choosing to build with steel is already a pretty green choice. So the main issue after that is to try and get your design locally fabricated. We have accomplished this. We are using another material in this stair though, and that is wood, for the treads. We will be acquiring reclaimed timbers (probably through our connection at Greenable) to use for the treads. The species will most likely be Chestnut, Elm, or Doug Fir.

And one last note. We also got Bill to fabricate us some steel posts for the railing up on the roof deck. For this rail we will be using stainless steel cables opposed to rods. This way, when your hanging out on the deck enjoying the green roof and the skyline views, the railing for the most part, simply disappears.