Monday, January 19, 2009

The steel stair arrives

Bill Curran dropped off the steel stair a couple of days ago. It took about 4 guys to haul it inside as it weighs around 350 lbs. This is the open-riser stair that runs from the first to the second floor. It looks really great. Bill and his guys did a beautiful job. Everything is very precise and the welds are clean and nicely hidden. He won't be dropping off the railings until later, when all the floors are installed and the walls are painted.


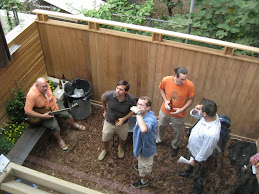
There's Bill, in the bottom left corner, admiring his work.

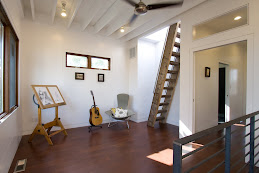
What you see here is the framework for the stair, without the wood treads attached. You can see the two stringers that run the full length and the open steel "frames" at each step. These frames act as a cradle for the wood tread to rest on. The treads will be attached with screws (from below) and will overhang the frames. You can also see that there are steel plates on either end. This is how the stair will be attached to the top and bottom wood headers. When we go to install the final stair, we'll remove the temporary wood stair and hoist the steel stair into place. I think we are going to use the temporary treads from the old stair on the new one until the final treads are ready to go in.

We could not really afford to get the metal stair and railings "powder coated", so the final finish will involve simply cleaning the raw metal with a degreaser and steel wool then applying a coat of beeswax. Although a powder coated finish is very nice, we actually prefer the more natural look of the wax finish, which allows the character of the material to show through.

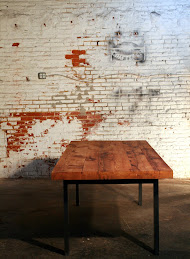
I am getting ready to plane down the reclaimed timbers that will eventually become the treads. We have a couple of different choices for the wood. We have Pine, Fir, and Oak beams. The Pine might be too soft but the Fir could work. To be honest, I am not much of an Oak fan, mostly due to the look of the grain, but I planed down a scrap piece of a 2.5"x11" oak beam to 2"x10" (our tread size), and it looks amazing.

What's nice is that it appears most of the 100 yr old beams are quartersawn, opposed to plain (or flat) sawn. Most people are used to seeing plainsawn oak which has a very wide, pronounced grain. To find wood this size that was milled in this manner is a treat. Along with it's beauty, quartersawn wood is much more stable and will take a finish better. I brushed a coat of polyurethane on one side of the planed beam and it turned a gorgeous honey color. I snapped a couple of pictures (below) that show the size and color as well as a close-up of the grain. We will most likely end up using this Oak for the treads, but if not, I am sure we'll find a place for it somewhere else in the house.

Saturday, January 17, 2009

Wrapping up the exterior cladding

We are just about finished with the installation of the fiber-cement panels (from Certainteed) the only thing left to do is caulk the joints. The other remaining tasks for the exterior are installing the sunshades and the continuous metal cap flashing at the parapet. You can see in the rear facade image to the left that we have already installed ledgers and metal straps above the windows which will support the weight of the sunshades.

The black plastic downspout at the right side of the image is a temporary solution that will soon be replaced by a smooth galvanized pipe that will empty into a rain barrel. Also, we are planning to paint the cover for the whole house fan (top right) either the same gray color as the fiber-cement siding or black to match the window frames. The sunshades, made of exterior grade FSC spruce, will be left with a natural wood finish.

In the end, we are very pleased with the way the panels look. There was a slight change in the fastening system relative to what was originally intended. We had planned on using nails to fasten the panels (as per manufacturer) but as our contractor began to install the panels, he realized that he was not getting the attachment strength that we needed. A few times the panels began to pull away from the sheathing. The problem was partly due to slight undulations in the surface of the sheathing and partly due to the large surface area of the panels which are 2' x 8' in size.

The fiber-cement panels are very rigid and offer little room for any flexing. They tend to want to flatten back out if the surface is not perfectly flat, eventually breaking the caulk seal. A couple of panels even ended up breaking at the beginning due to the bending stress in addition to the impact of the hammer. We found that attaching the panels with stainless steel screws (which is also approved by the manufacturer) using a hammer drill gave us a much more secure connection.

Due to budget constraints, we are not using a rain screen system (which would involve furring strips or vertical runners and therefore would eliminate the flex issue) but instead we are simply attaching the panels directly to the sheathing, caulking only the top and side joints, while allowing any moisture to find its way down and vent out the bottom of the panels. We're hoping to explore a true rain screen system in the next project, possibly using Vaproshield (opposed to Tyvek, which we used and is great product but is white in color and not great if at all visible) for the waterproof membrane and a recycled composite (like Trex) for the vertical channels.


The image to the left shows where the east wall at the third floor (the party wall) meets our metal mansard roof at the front.


The exposed fasteners are more pronounced than we originally envisioned (the nails would have been flush with the face of the panels), but we love the look of it. The evenly-spaced screw heads along with the softly textured, concrete-colored FC panels are reminiscent of poured-in-place concrete with snap-ties (similar to the image below). We realize the appearance might not appeal to everyone, but we feel it embodies the modern aesthetic of the 'new addition' portion of the house.

Thursday, January 8, 2009

Inspiration from Re-Nest

Stephanie from Apartment Therapy's Re-Nest posted an article today about our project. Check it out here. For anyone who's not familiar with Apartment Therapy, it's a great design resource especially geared towards small spaces. Re-Nest is part of the Apartment Therapy 'family' and focuses on green home design. Since we have a 20-month old son, we also love ohdeedoh for their clever approach to design and children. Be sure to return often as these sites are all updated frequently. Many thanks to our good friend Summer for sending in the suggestion!

The new year is a great time to get inspired and to re-evaluate one of the most important spaces that surrounds us: our home. While trying to take that to heart by undertaking some small projects to update our own house, we've been doing more thinking recently about the types of finishes that we'd like to use in the Montrose House and the overall feel that we'd like the space to reflect. Yes, we are modernists at heart but we also like a house to be warm and livable at the same time. It's a fine line to walk sometimes. More on all this in the upcoming weeks...

Tuesday, January 6, 2009

NBC Channel 10 News segment

Here's a link to the video clip on NBC's site: NBC Philadelphia.com: Greening History. You can also view it right here:


Our 'green renovation' news segment aired bright and early this morning, Wednesday Jan. 07, at 5:45am and 6:45am. It will also air again on Sunday, Jan. 11, at 7:30 am. Thanks to Terry Ruggles of Channel 10 for considering the Montrose House for their segment.

Work on the house slowed considerably over the holiday. Today we're meeting with our contractor at the house to pick up where we left off before the break and determine what outstanding work is left to do on his end. We'll also be heading up to Chinatown to meet with our stair fabricator to iron out some last minute questions on the dimensions and detailing of the steel stair. If all goes well, it should be ready to install by next week! Things are picking back up now and we'll post more updates shortly.